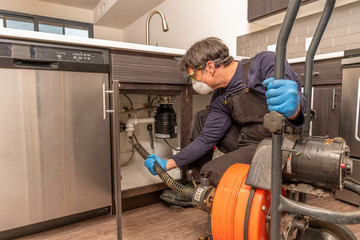
Plumbing is a physically demanding job that requires strong physical stamina and the ability to work in tight spaces. It can also involve working with dangerous chemicals and sewage.
Plumber Spring is a skilled professional specializing in installing, repairing, and maintaining plumbing systems. These systems include pipes, fixtures, and appliances such as sinks, toilets, and water heaters. Plumbers use various tools and techniques to diagnose and fix issues. They also interpret blueprints and building codes to plan and execute plumbing installations.
Plumbers must have strong customer service skills to interact with clients and explain complex plumbing procedures clearly. They may need to work outside of normal business hours in response to emergency situations, which can disrupt personal schedules. In addition, plumbers often work with dangerous materials and are at risk of exposure to disease-causing microbes when working on sewage systems.
Because plumbers are responsible for the safety and health of a home’s occupants, they must follow strict cleaning and disinfection protocols to prevent the spread of illness. This includes wearing protective clothing and masks when handling sewage waste, as well as using gloves and eye protection when cleaning up spills or repairing plumbing components. It’s also important for plumbers to regularly update their training on new plumbing technology and techniques. This ensures that they are knowledgeable and equipped to handle any situation that arises.
Disassembling the Faucet
If a customer complains of a leaky faucet, the plumber may need to disassemble the fixture to inspect and repair it. Even though it’s a little bit messy, it is essential to lay out the parts as they are removed to ensure that each part is returned in its correct place when reassembling the faucet. This way, you don’t end up with a loose handle or a water spot on the counter.
Before beginning any work on the faucet, make sure that it is completely shut off by using the two shut-off valves under the sink. Then, place a towel beneath the faucet assembly to protect the countertop and catch any dropped parts. You should also remove any decorative caps, buttons or plugs on the faucet handle, which are often used to hide a screw or fastener. Once the handle is off, you’ll have access to the water supply tubes, which are usually plastic or chromed copper. These can be unscrewed with the use of channel-type pliers, and you’ll probably need to disconnect the hoses from their valves, as well.
Once the water supply tubes are disconnected, you should be able to see the big nut that holds the entire faucet assembly in place. This nut is typically tight, but you can usually remove it with the use of a wrench. At this point, you should have enough room to work on the rest of the faucet.
If the faucet has a cartridge, you can replace it by first removing the handle and escutcheon ring, which are held in place by the same screw that holds the handle on. You may have to remove the screw a few turns to loosen it, but once it’s free, pull out the old cartridge and install the new one by lining up the brass retainer clip with the slots in the valve body and twisting it on.
Most modern faucets have a spray hose unit attached to the spout, which can be repaired by disconnecting it and taking apart the spray head and activating lever. If the spout body is leaking or defective, you’ll need to replace it with an identical unit. Most spout units are made of solid brass, but some are made of other materials, such as zinc or plastic.
Finding the Parts
Plumbers work on plumbing systems that facilitate water, sewage and waste disposal in residential, commercial and industrial settings. Their duties are to install, repair and maintain these systems in order to ensure a safe and effective supply of water and proper drainage. Plumbers must be familiar with a variety of tools and equipment, including specialized instruments for inspecting pipes and identifying potential problems. They also must be familiar with building codes and regulations.
The path to becoming a plumber begins with completing an educational or training program. Many plumbers receive their education through an apprenticeship, which combines classroom instruction with paid on-the-job training. Others choose to attend a trade school or technical college, which offers programs specifically designed for those interested in becoming plumbers. Coursework often includes topics like local plumbing codes and regulations, blueprint reading, and safety practices.
Once a plumber has completed their education and training, they must obtain a license in order to work legally in the field. A license can be obtained by passing a written and practical exam. In addition to obtaining a license, plumbers must have excellent customer service skills in order to interact effectively with clients. They must be able to explain complex issues in easy-to-understand terms and provide accurate estimates for their work.
Depending on the job type, plumbers may need to use a variety of tools and equipment. Common hand tools include wrenches, screwdrivers and pliers. Other tools may include pipe cutters, hammers and soldering guns. Specialty tools include video cameras for inspecting pipes and electronic leak detection devices. Keeping a toolbox well-stocked with the appropriate tools will help plumbers complete their work quickly and efficiently.
Because plumbers must travel to client sites, they need a vehicle with sufficient storage space for their tools and supplies. In addition to traditional car supplies, such as oil and spare tires, plumbers should have communication tools, such as cell phones or two-way radios, and administrative supplies, such as tablets or laptops for running plumbing software.
Reassembling the Faucet
When you’re reassembling the faucet, make sure to label and keep track of each part as you remove it. This will help you reassemble the faucet in the correct order. Before reassembling, inspect the parts for metal shavings, worn or broken pieces, and grit or mineral deposits. If there are, clean them with distilled white vinegar and a scrub brush or scouring pad to prevent water spots and corrosion. You can also use plumber’s grease to lubricate any threaded areas. You can find this at most hardware stores, but you may need to shop around a bit to get the right type of grease for your faucet.
To reassemble the faucet, start by removing any decorative caps and unscrewing the handles. Then, fit your wrench to the packing nut underneath the handle and loosen it. Be careful not to bang the handle because it’s possible to break the inner workings. If the handle is stuck, try wiggling it back and forth or prying it upwards with a screwdriver blade. Once the stem nut is removed, lift out the cartridge and examine it for signs of damage or wear. If the cartridge is damaged, you will need to replace it with a new one compatible with your faucet. Also check the rubber washers and ring-shaped seals, replacing them as needed. You can buy cartridges and washers online or at any hardware store.
If the valve seat is damaged, you can sand it with an emery cloth to smooth it. After sanding the seat, you should be able to see if there’s pitting. If it’s too pitted, you will need to replace the entire valve seat. You can buy these at any hardware store and they’re fairly easy to install.
If you have a double-handle faucet, you can replace the O-rings and reassemble the handles. The most common cause of leaks in this type of faucet is the O-ring, which is often leaking or cracked. It’s important to replace the O-ring with an identical size as it’s the only seal between the valve seat and the faucet handle. Once you have all the parts reassembled, turn on your water supply and test the faucet for leaks.